1 Process Overview
1.1 Introduction
So, you go out into the field and deploy a bunch of game cameras. Maybe you deploy passive acoustic recorders at the same time. Then what?! You will have a lot of data to manage.
Consider this. A single game camera on a single deployment can collect thousands of images. If you deploy several cameras, you will very quickly start to amass tens to hundreds of thousands of images, or more!
1.1.1 Considerations
You will need to consider many questions, such as:
Where will you store all of these image files?
Will you back them up? Where? How?
How will you organize all the images to that you can:
- easily find images from any particular deployment?
- avoid confusing images between deployments?
- prepare images for classification?
- How will you classify the images? What steps need to happen to prepare images for classification?
Try to answer these questions early in your project development - doing so will save you headaches further down the road!
Plan for how you will manage all of your game camera images early in the development of your project to save yourself work and headaches later on.
1.2 Our workflow
The general workflow we have developed for processing and logging image data from game cameras is depicted in Figure 1.1.
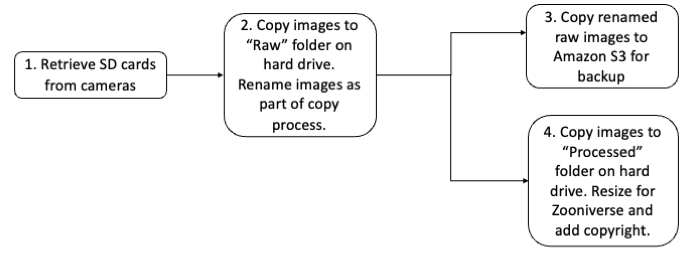
We use an external hard drive attached to a computer in the lab as the location where we copy all images from our game camera SD cards. We copy raw images from the SD cards, renaming the files as they are copied so that each image file name informs us of the camera and SD card the image is associated with as well as the timestamp for the image.
To back up our images (in case of hard drive failure - it happens!), we also copy the renamed, raw images to Amazon Web Services S3 cloud storage.
Our current workflow (Fall 2025) involves using the Zooniverse platform for image classification by volunteers (rather than using machine learning to ID animals in images). As a result, we also have to process all of our images by downsizing them for upload to the Zooniverse. As we downsize them, we also add copyright information the image EXIF data and copy the images to a “Processed” folder with the same directory structure as the “Raw” folder.
1.3 Hard Drive Organization
1.3.1 Year-by-year directories
Our external hard drive is organized so that there is a subdirectory on the hard drive for each year in which game cameras were deployed. Our “year” more-or-less follows the academic calendar, and images are saved in folders based on the deployment date for the camera. We do the majority of our deployments from August through December each year.
Our practice is to include images from deployments conducted during the summer (outside of our normal academic year) with the academic year that precedes the summer. So, for example, if we deploy cameras in July 2025, they will be located in the folder 2024_Game_Camera_Photos since they are associated with the 2024-2025 academic year and come before the start of the 2025-2026 academic year.
1.3.2 Raw and Processed Subdirectories
Within each year’s subdirectory, we include two subdirectories. One is called “Raw” and the other is called “Processed” (Figure 1.2).
Nested within each of these directories is a unique directory for each camera deployment. Each of those subfolders is named with a combination of the Camera number and SD card number that was used for each deployment. The overall organization therefore looks something like what is shown in Figure 1.2.
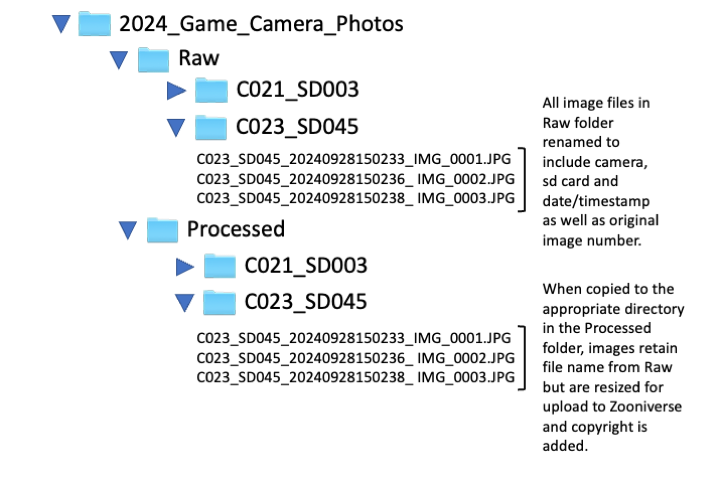
Notice in Figure 1.2 that the “Raw” and “Processed” directories follow the same folder structure. Within each, there is a single folder for each camera deployment. We name these folders by the combination of camera number and SD card number associated with the deployment. For example, the deployment of Camera 23 that used SD card 45 is assigned the folder name C023_SD045.
Our shop started using game cameras in 2019 and we didn’t think as much as we should have about how we would organize files at that time. We were just starting out, and assumed that each camera + sd card combination would be unique. It didn’t take long before we had a repeat instance of the same camera + sd card. That’s why we started adding the timestamp as well as the camera and sd card number to each image file name. If you are just starting, give some serious thought to how you want to organize all this data!
1.4 Amazon S3 Cloud Organization
On the Amazon Web Service S3 cloud storage (henceforth “AWS S3”), we don’t go to the trouble of organizing images into subfolders. Because all images are named uniquely with a combination of camera, sd card, and timestamp, we can put all of the images into the same “bucket” (in AWS lingo) without fear of confusing images with one another.
We store our images in the “glacier” storage, which means that we pay less to back up the images, but we cannot access them immediately (within seconds or minutes) but may have to wait for hours or a few days for access. Thus, keeping the images on our local hard drive organized by deployment, rather than in one giant bucket, makes it easy to quickly locate the images associated with a particular camera deployment.